Efile Help
Electronic
Filing
Premium Pro Enterprise has electronic filing capabilities for selected
states that accept returns in an electronic format. TriTech helps facilitate
the electronic filing of premium tax data and we work with all parties
to do so.
Currently, Premium Pro supports two methods of electronic filing: E-filing
via TriTech and E-filing via NAIC OPTins. With all available electronic
filing methods, a basic validation process will occur before you will
be allowed to submit the return data. Each state has some minimum requirements
as well as unique criteria that need to be completed before submission.
Please see the State Specifics topic for electronic filing requirements
and further information.
Electronically Filing through TriTech
E-filing via TriTech is a free submission option which has been designed
to meet the specific filing requirements for various states that have
agreed to collect premium tax data electronically. Instructions are provided
below.
Steps for E-filing through TriTech
- View or select the desired return in Enterprise.
- Fill out the return completely, just as you would a paper return
and verify that all information is correct.
- When you are satisfied that all information is correct and complete,
click the E-file via TriTech button on the return.
- A dialog box will appear stating that “You are E-filing the [State
Return]”. You will be asked, “Do you want to Continue?” Answer accordingly.
- When you select Yes to proceed, an e-file wizard will appear to
assist you in completing the electronic filing process.
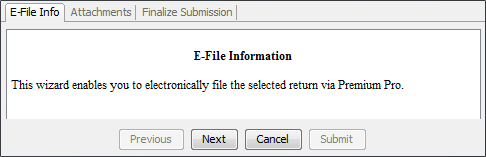
On the initial E-file Info tab, review the information listed and click
Next to proceed. The Attachment Tab allows you to include attachments
with your filing. This may include supporting documentation for credits,
requests for refunds, etc. You can add or remove attachments as necessary
using the appropriate buttons.
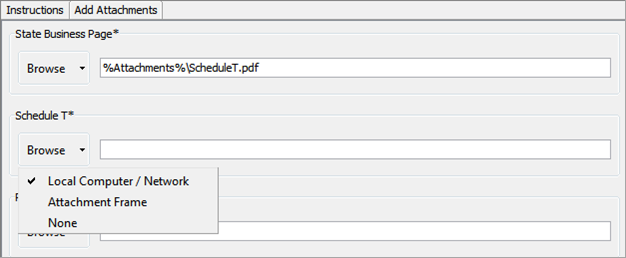
Any attachment with an asterisk is required and must be attached before
you can submit your filing. Some of the attachments may already include
a path to a file if you previously added items to your return via
the Attachment Frame and designated the document as an E-file Attachment.
To include or edit an attachment, click the down arrow next to the
browse button to specify a location: Local Computer/Network, Attachment
Frame, or None. Browse to the desired file and select OK or Open.
- Click Submit to complete the process.
You may need to allow a few moments for the encrypted data to transfer.
You should then see a message stating that the file transfer is complete.
Soon after, an email confirming the transmission of the file will
be sent to the contact email address provided on the return as well
as any additional contacts listed on the efile options tab. Tools>Options>Efile
The electronic submission of the return is the official filing. It
is not necessary to mail a printed copy.
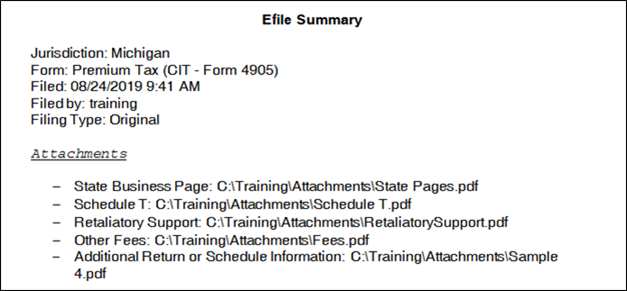
A PDF version of the electronically filed return will also be saved
to the attachment frame under an E-filed Returns folder for your records.
The PDF will include an Efile Summary that summarizes the transmission.
Efiled PDF attachments are also printed to the Attachment Frame. In
addition, any supporting forms such as the CT-33-M that is filed with
CT-33 for NY, will be printed to the Attachment Frame.
The PDF generated for e-filed returns uses the pdf print naming convention.
(Tools>Printing Options>Print Job Name)
- A visual indicator, a green ‘e’, will appear beside the return
name in the active tree for filings that have been successfully transmitted.
Both failed and successfully transmitted electronic filings will be
noted in the Actions report. When applicable, the e-file submission
ID will also be recorded in the report.
For some states, you will receive additional email notifications regarding
either the state’s acceptance or rejection of your filing. See the
state specifics for additional information.
Payment options vary by state and are dependent on the payment methods
accepted by the taxing jurisdiction. Please see the state specific
efile appendix or the help files for the available payment methods.
Electronically Filing through NAIC OPTins
E-filing via NAIC provides you with the ability to submit filings to
select states that are participating in the NAIC OPTins program.
During the electronic filing process, Premium Pro copies specific data
from the state return in the software to the official excel file used
by OPTins. Because of the transfer process, some items are recalculated
in the excel spreadsheets. To avoid any discrepancies, the values between
the Premium Pro return and the OPTins spreadsheet are compared and validated
prior to submission.
Instructions are provided below.
Steps for E-filing through NAIC OPTins
To electronically file your returns through the NAIC, you must first
register to use OPTins and EFT for payment of premium taxes. You will
need to contact the OPTins Marketing Department at 816-783-8787 or optinsmktg@naic.org
for more information. You may also visit the OPTins website at http://www.optins.org/.
Once registered, please follow the steps below to electronically file
your return.
- View the desired return in Enterprise.
- If you are filing a non-mandatory state, check the box at the top
of page one of the return to indicate that you plan to electronically
file the return using the E-file via OPTins feature. For 2019-2020,
this checkbox rolls over from the prior year.!NEW
- Fill out the return completely, with all company information, premiums,
and other required information, just as you would a paper return.
Verify that all information is correct.
- When you are satisfied that all information is correct and complete,
go to the first page of the return and press the "E-file via
OPTins" button.
- An Efile Action Dialog will appear and give you the option to Validate
Data, E-file, or Cancel.
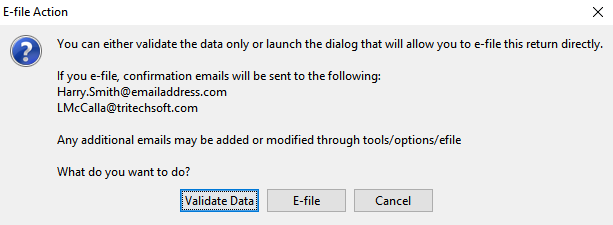
- If you select Validate Data, the software will display any differences
between the software values (including overridden values) and the
OPTins Excel calculations. This will allow you to determine if any
changes or correction should be made on the return in the software
before proceeding.
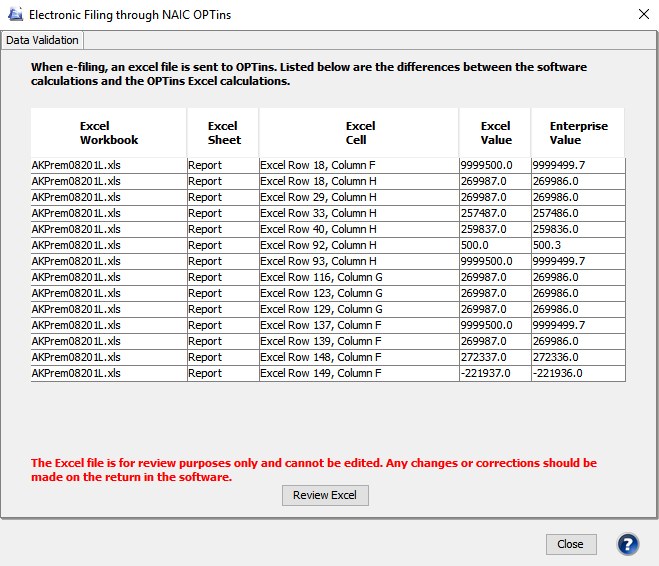
- If you click the Review Excel button, the OPTins Excel version
of the return will load and any differences will be highlighted in
yellow.
Please note that this is for review purposes only and cannot be edited.
Select close to close the Data Validation. If you select the Efile
Button, the NAIC OPTins Efile Wizard will appear. The first tab is
the Data validation and displays the same information you reviewed
in the previous steps if there are any discrepancies.
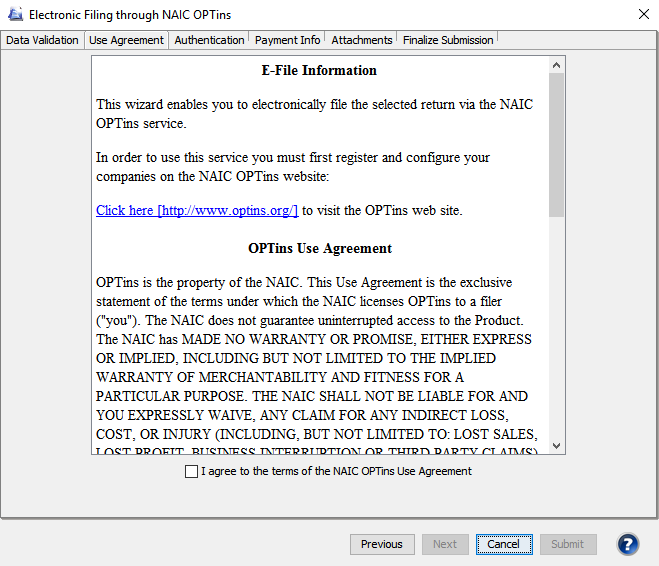
- On the next tab, review the OPTins Use Agreement and select “I
agree to the terms of the NAIC OPTins Use Agreement” to enable the
Next button.
- On the Authentication Screen, verify the Company Information section
and enter your OPTins username and password previously provided by
the NAIC. Click the button to verify the information.
- When the user name and password are authenticated, you can proceed
by selecting the Next button. You can also check the Remember Me box
on this screen to prevent having to reenter your login information
each time you go through the OPTins wizard. Please note that the login
information is user specific.
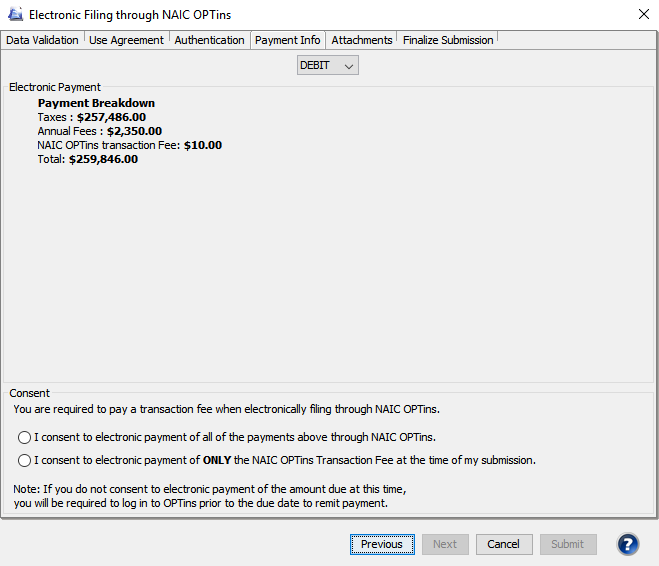
- On the Payment Information tab, choose whether you are paying via
Debit or Credit from the dropdown box. The payment breakdown lists
the state's specific payment categories and the corresponding amounts,
the OPTins transaction fee, and the total amount due.
- If you choose Debit, review the payment breakdown then:
- Consent to the payment of either ALL of the payments or
ONLY the NAIC OPTins Transaction Fee at the time of submission.
If you choose to consent to the payment of the transaction
fee only, you will need to remit payment directly from the
OPTins system before the due date of the return.
- You must agree to pay the transaction fee before you can
proceed with the filing.
- Your filing is considered filed with the state upon submission
when choosing the Debit option.
- Click next.
- If you choose Credit, review the payment breakdown then select
Next.
- Upon successful submission, you will receive an addenda
record which you will give to your bank to submit the payment.
The filing is not considered submitted until the payment is
received by OPTins. You will receive an acceptance email within
one business day from when the payment is processed by OPTins.

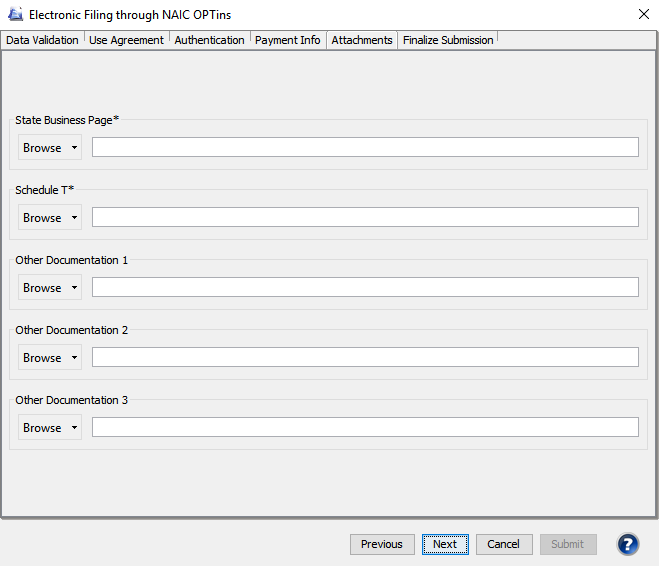
- The Attachment tab allows you to include any file type as an attachment.
This may include scanned signature pages, supporting documentation
for credits, requests for refunds, etc. You can add or remove attachments
as necessary using the appropriate buttons.
Any attachment with an asterisk is required and must be attached before
you can submit you filing.
Some of the attachments may already include a path to a file if you
previously added items to your return via the Attachment Frame and
designated the document as an E-file Attachment. To include or edit
an attachment, click the down arrow next to the browse button to specify
a location: Local Computer/Network, Attachment Frame, or None. Browse
to the desired file and select OK or Open.
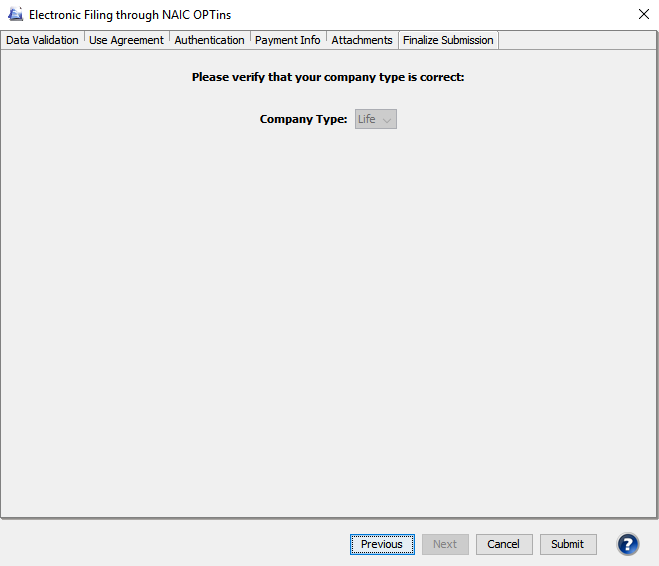
- The last tab on the assistant is Finalize Submission. It may be
necessary to select your appropriate company type from the dropdown
box. Once you have selected your company type and reviewed the Excel
file, click on the Submit button.
- You will receive a submission message stating that the filing was
submitted successfully. The electronic submission of the premium tax
return is the official filing. It is not necessary to mail a hard
copy of the premium tax return.
You may need to allow a few moments for the data to transfer. You should
then see a message stating that the file transfer is complete. Soon after,
an email confirming transmission of the file will be sent to the contact
email address provided on the return and any email addresses included
on the efile options tab. A PDF version of the electronically filed return
will also be saved to the Attachment Frame under an E-filed Returns folder
for your records. The PDF will include an Efile Summary that summarizes
the transmission. Efiled PDF attachments are also printed to the Attachment
Frame.
The PDF generated for e-filed returns uses the pdf print naming convention.
Tools>Printing Options>Print Job Name
For OPTins states, the NAIC Banking info (bank name, account number
and routing number) will be included in the efile summary and in the email
confirmation.
A visual indicator, a green ‘e’, will appear beside the return name
and each sub-form that was part of the efiling in the active tree for
filings that have been successfully transmitted.
Both failed and successfully transmitted electronic filings will be
noted in the Actions Report.
Steps for E-filing an Amended Return
through NAIC OPTins
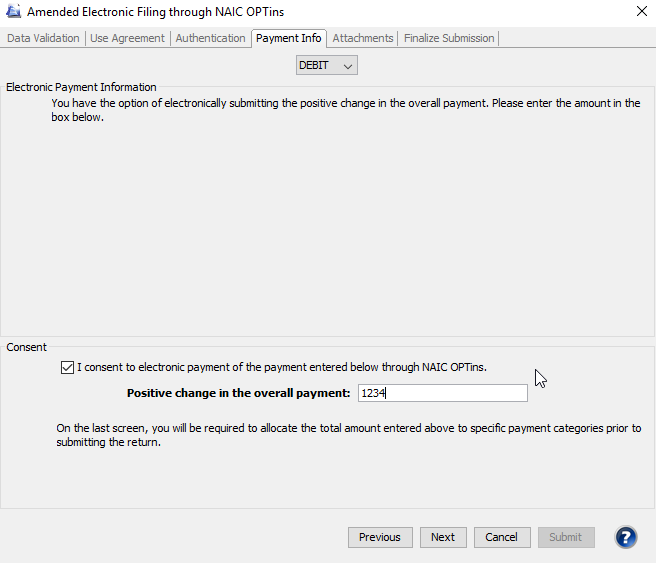
When filing an amended return, you will follow the same steps as above
until you reach the Payment Info tab. For amended filings, if you have
a positive change in the overall payment that you would like to pay via
ACH Debit or ACH Credit, you should enter it here.
Then, on the Finalize Submission tab you will be required to allocate
that positive difference in overall payment into the specific payment
types in the OPTins system before you can proceed.
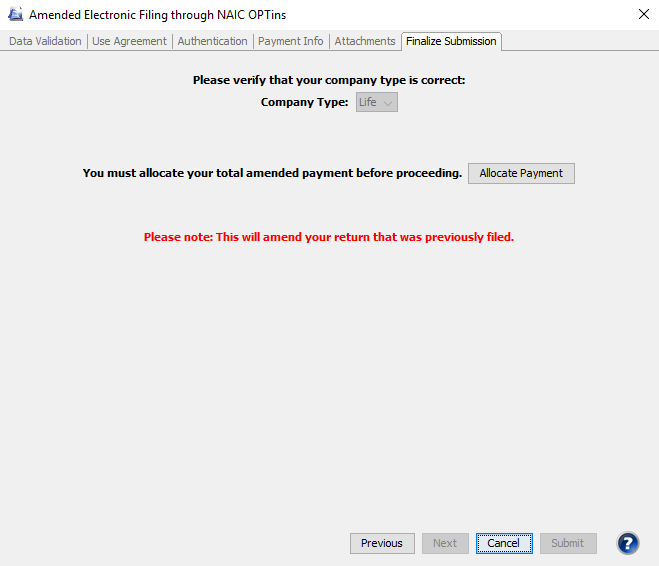
To do so, click on the Allocate Payment button, which opens a dialog
to allocate the payment.
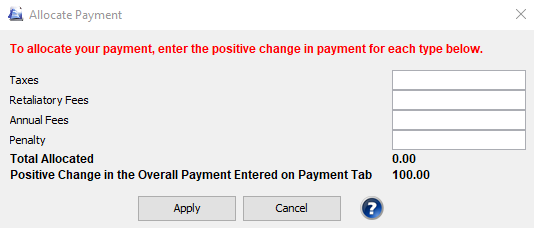
In this dialog, allocate the amounts for each payment type so that the
total allocated amount matches the positive change in the overall payment
entered on the payment tab. The exact payment types will vary based on
the return and the type. Once the allocation is done, click Apply to proceed.
For OPTins states, users may now highlight one return or multiple returns
in the Active tree and right click to select Auto-Efile. This will run
the Efile process for the selected state returns in the background. This
eliminates the need to manually walk through the OPTins wizard for each
return. In order to use this new feature, administrative users must enable
the option to do so. (Tools>Options>Efile
Options)
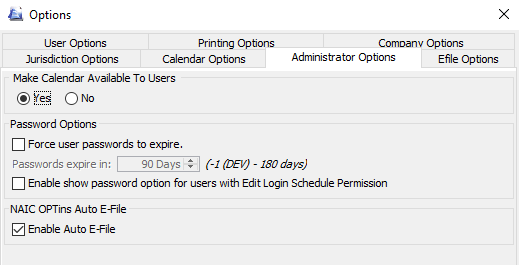
In addition, the options need to be completed to default the values
for the required items needed during the OPTins efile process. If you
do not use the Auto-efile feature, users may still fill in the options
(Tools>Options>Efile)
and these will be used as the defaults in the OPTins wizard.
Export
Some states, such as UT, have the option to create a file that can be
used to populate the state’s online system with data from the tax return
in the software. Select the Create Text file button and save the file
to a location you can access later. Upon completion, log into the state's
website and upload or import the file.

Email
Some states (Alabama, DC, Nevada, and Ohio) have an email option. Selecting
this button prints a copy of the return to PDF and generates an email
addressed to the state with the necessary identifying information and
return attached. When you select the Email This Return button, an email
wizard will appear. The Attachment tab allows you to include any file
type as an attachment. This may include scanned signature pages, supporting
documentation for credits, requests for refunds, etc. You can add or remove
attachments as necessary using the appropriate buttons.
A warning will pop up when you try to email previously emailed returns.
Any attachment with an asterisk is required and must be attached before
you can submit you filing. Some of the attachments may already include
a path to a file if you previously added items to your return via the
Attachment Frame and designated the document as an E-file Attachment.
To include or edit an attachment, click the down arrow next to the browse
button to specify a location: Local Computer/Network, Attachment Frame,
or None. Browse to the desired file and select OK or Open.
On the Review and Submit Email tab, you may double click on the items
listed in the Attachments section to review the PDFs that will be submitted.
The email addresses the filing will be sent to, subject, and body of the
email are visible as well on this tab.
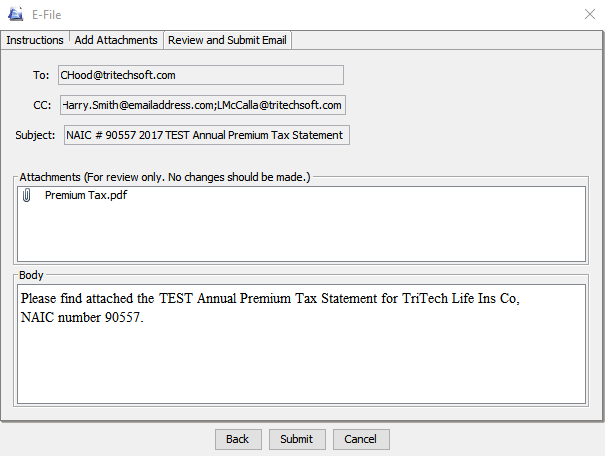
Clicking the submit button will send the email.
Efile Options
Users have the option to designate additional email address(es) to receive
copies of the e-file confirmation emails. Tools>Options>Efile
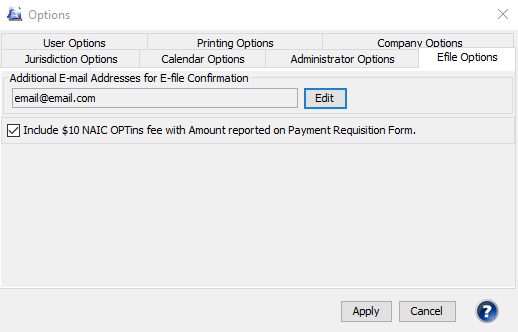
You may check the option that says 'Include $10 NAIC OPTins fee with
Amount reported on Payment Requisition Form' in order to include the $10
NAIC fee in the total amount listed on the Payment Requisition form. A
label reading '*Includes $10 OPTins Filing Fee' will be enabled as well
indicating that the fee has been added.

The options for NAIC OPTins Auto-Fill are also listed under this tab.!NEW
If Source from NAIC OPTins Auto-Fill Options is not selected, then none
of the following fields will be editable.
Under Log-In information, you may enter your OPTins username and password.
You may also select either debit or credit as your payment method. Then,
select either to consent to the electronic payment of ALL the payments
for this return, or of ONLY the NAIC OPTins Transaction Fee. Finally,
the Process Date Options apply to Debit filers and allow users to select
a future date for when a return and the corresponding payment will be
processed. Users can select the number of days after initiating the electronic
filing of the return and the number of days prior to the return due date.
Our website
address: www.tritechsoft.com
Our mailing
address: 1205 S. Greenville Ave, Allen, TX 75002.
Questions?
You can reach us at 1-800-380-6407
Or
contact Support
here.
©1995-2019
TriTech Software Development Corp. ©2006-2019 TriTech Services Inc. All
rights reserved. Premium Pro® is a registered trademark.