
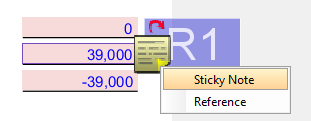
You can add “sticky notes” to any form to add custom notes to specific lines or sections of a form. Once you add a note, a yellow sticky note icon will be visible on the return in the location where you placed it. The note will contain the user ID of the person who created the note, as well as a time and date stamp. The name, date, and time listed on a sticky note is updated based on the most recent user that modifies the note.
Sticky Notes added to a form by the user will also print, if that printing option is selected. To select this option, go to the Tools Menu, and select options. Then click on the Printing Options tab. Check the box under Reviewer Layer that says Sticky Notes. The notes will print after the return before the payment request and any supporting documents.
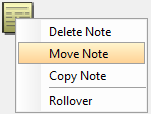
To move the note, right-click on the note icon and select Move. Then you may click on a different area on the form to place the note.
To delete a note, right-click on the note icon and select Delete.
You may run into an occurrence when you have more than one markup tool overlapping on a single field or location on a return. When you right click on the area, the menu for the wrong tool may show up. To switch to the tool options you want to access, use Alt + right click.
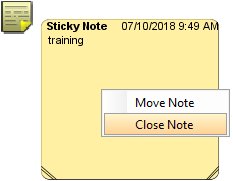
To minimize a note so that only the icon is displayed, double click on the yellow note icon, or double click the title bar of the expanded note, or right click on the expanded yellow note box and select Close Note. To open it again, double click on the icon.
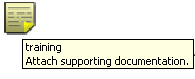
When the note is minimized and only the icon is showing, a tooltip displaying the contents of the note will appear when you hover your mouse over the icon.
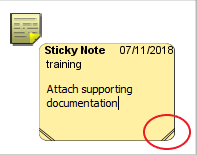
To resize a sticky note, click and hold in either the bottom left or bottom right corner of the expanded note box and drag the corner to the desired size.
To copy the sticky note, right-click on the note icon and select Copy Note. You may then right-click on other areas, pages, and returns and choose Paste Sticky Note.
If you would like the note to rollover to the next product year, right-click and choose Rollover Sticky Note. The icon will then have a red arrow indicating that it is set to rollover. If you later decide the note does not need to rollover, right-click on the field and choose Unset to Rollover.

Our website address: www.tritechsoft.com
Our mailing address: 1205 S. Greenville Ave, Allen, TX 75002.
Questions? You can reach us at 1-800-380-6407
Or contact Support here.
©1995-2019 TriTech Software Development Corp. ©2006-2019 TriTech Services Inc. All rights reserved. Premium Pro® is a registered trademark.