Allocator Options
The Options dialog (Tools-->Options) is used to set or control
program options, such as default report file location, or to customize
the Source ASCII file layout.
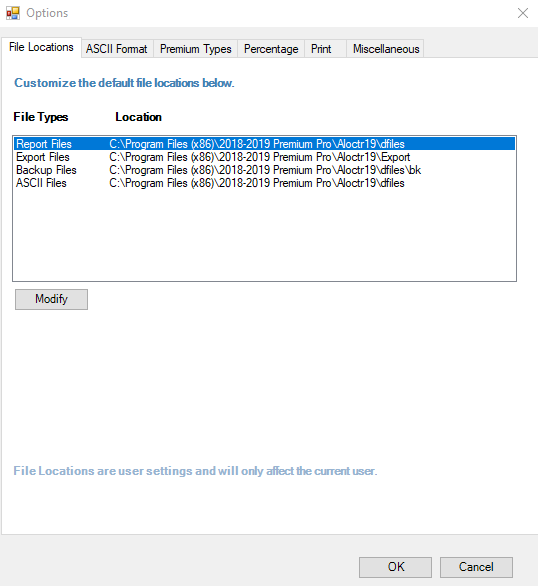
FILE LOCATIONS Tab
You can change the default directory where Allocator files are created
and stored by selecting the file path you want to change and clicking
Modify. Use the browser control to select the new file path.
Any user changes to the default field lengths in the options will be
denoted with an asterisk.
- Report Files - All report files
be created here.
- Export File - Any files export
will be created here.
- Backup Files - If you select
the feature save a copy of a report file before appending a new ASCII
file, the original report file is saved here.
- ASCII Files - The browser defaults
here when you search for an ASCII file to process using the GeoCode
Address dialog.
To change the file location:
- Select Options from the Tools menu.
- Double click on the file type path you want to modify. Then use
the browse window to change the location.
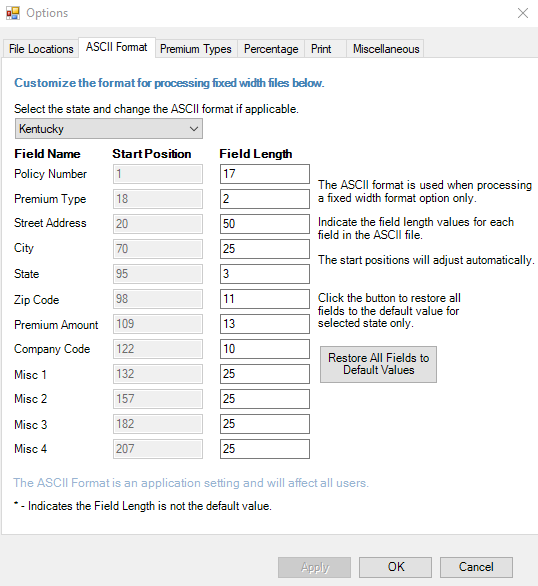
ASCII FORMAT Tab
If you are processing an ASCII file in fixed width format, you can increase
or decrease the size of the fields to fit your needs (See Appendix C).
Custom column widths for fields cannot exceed 250, except for the Premium
Amount field which cannot exceed 25, and the Zip Code and State fields.
A separate custom format is applied to each module. ASCII formats are
applied on a state by state basis. This option must be selected before
processing a file.
To customize the source data
fields
- Select Options from the Tools menu.
- Select the ASCII Format tab.
- Change the starting position and length of each field you wish
to customize.
PREMIUM TYPES Tab
You can change the premium type codes used in the source ASCII file
(See Appendix C).
A separate set of custom codes is applied to each module. Multiple custom
codes can be assigned to each default code. Each custom code is separated
by a comma. You can map multiple lines to a single premium type code (e.g.,
line 10, 11, 12 = C). Premium types are applied on a state by state basis.
This option must be selected before processing a file.
To change the premium type code:
- Select Options from the Tools menu.
- Select the Premium Type tab.
- Change the premium
code which corresponds to the premium type you
wish to customize. If you are entering more than one premium code, separate
with a comma.
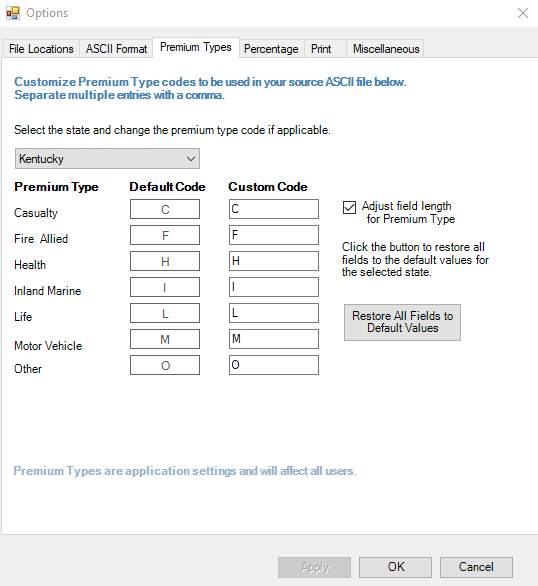
If you use custom codes instead of the default ones, and if your ASCII
file is in fixed width format, make sure to check the ASCII FORMAT Tab
to make sure the Field Length matches your file.
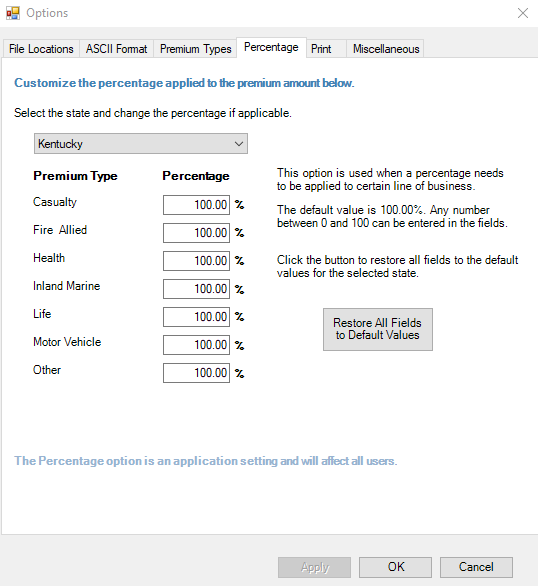
PERCENTAGE Tab
You may assign a percentage to each Premium Type. This percentage will
be applied to the Source Premiums of each policy. The resulting product
will appear in the Premiums column. The total of the Premiums column will
appear on the Allocation Summary Report. The percentages can be used to
reduce source premiums to taxable premiums. The percentages are applied
on a state by state basis. This option must be selected before processing
a file.
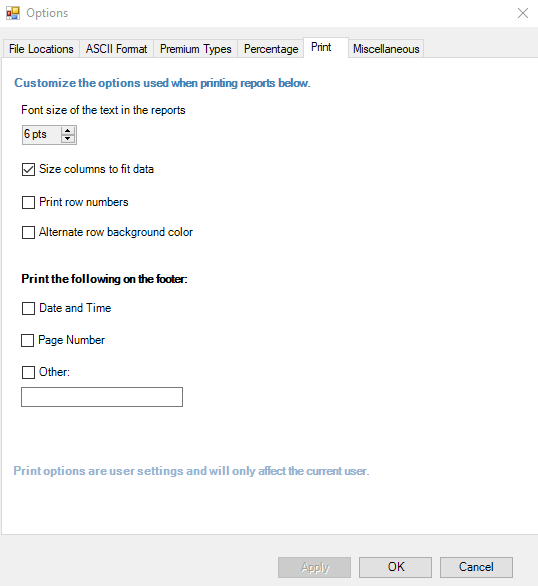
PRINT Tab
The Print Tab allows you to customize the options used when printing
reports.
- You can increase or decrease the font size of a printed report.
- You can choose to size the columns to fit the data, print row numbers,
and alternate row background color. Checking this option will alternate
each row color between white and gray.
- You can print the date and time, page number, and a user created
message on a footer that appears on each report.
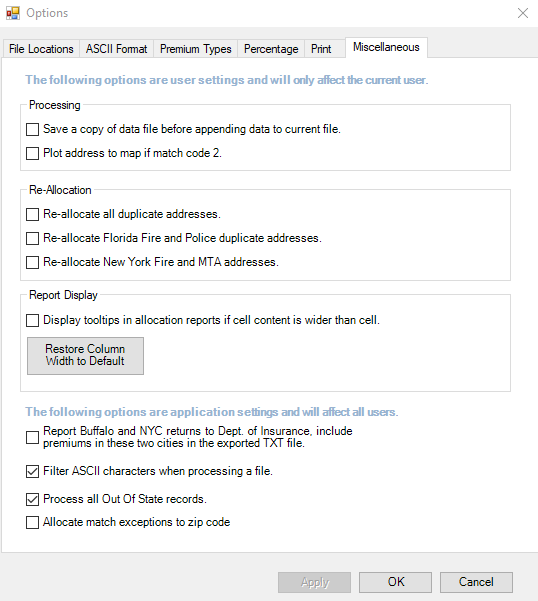
MISCELLANEOUS Tab
Processing
If you would like to use the following options, they must be selected
before processing a file.
- Save a Copy of Data File Before Appending Data to Current File. If
you chose to “Append Data to Current File” during Process Premiums,
this option will allow you to save a copy of the current data file. This
gives you a backup of the data file in the event that the program
errors during subsequent processing.
- Plot Address to Map if Match Code 2. By default, this option is
not selected. There is little benefit to returning a poor
matched address on detail reports and plotting the coordinates to
the map because this information is not utilized to determine the
taxing jurisdiction. Using the option will increase the amount of
time necessary to process a file. It is not necessary to
have this option enabled to correct an address.
Re-Allocation
- Re-allocate all duplicate addresses. This option will
cause all policies having identical addresses to be re-allocated to
the same corrected address (when you are correcting an address using
the Geocode Address dialog).
- Re-allocate Florida Fire and Police duplicate addresses. This option
works the same as the Re-allocate all duplicate addresses option.
However, addresses will be changed in both modules.
- Re-allocate New York Fire and MTA duplicate addresses. This option
works the same as the Re-allocate all duplicate addresses option.
However, addresses will be changed in both modules.
Report Display
- Display tool tips. Sometimes the contents of a field
are longer than the width of the field. As a result, the text is truncated.
When Display Tool Tips is selected, you may read the obscured text
by floating the cursor over the affected field.
- Restore Column Widths to Default – Click the button to restore
column widths to default values. The change will be applied
to the report currently open.
Other Options
If you would like to use the following options, they must be selected
before processing a file.
- Report Buffalo and NYC returns to the Department of Insurance,
include premiums in these two cities in the exported TXT file. The
NY Department of Insurance indicated that you can pay the foreign
fire tax for these cities by filing with the cities directly or by
filing with the Dept. of Insurance text file.
- You can choose to filter ASCII characters when processing a file.
By default, only certain characters are allowed in the ASCII file.
Characters not included in the list will be filtered during the process.
De-select this option if you would like to use any characters. If
the option is de- selected and characters used in the ASCII file cause
the Allocator program to terminate or error, you will need to either
check this option or remove the characters from the file. Please note
that this option does not affect the delimiter. Any delimiter can
be used. Each line in the file must end with a Carriage Return/Line
Feed. Please note that this list does not affect the delimiter. Any
delimiter can be used. Allowable characters are:
- Letters: A-Z and a-z
- Numbers: 0-9
- Characters: ! " # ( ) + - , . / : ; < > ? [ ] \
_ ` { }
- Process all Out of State Records. This option will place out of
state policies in the state you have selected to process. Records
may be assigned a match code of 5 (address not in state). Out of state
records will not appear under the Other Jurisdictions node.
- Allocate match exceptions to zip code. This option can be used
if the address cannot be allocated to a matching address or the source
city. The option takes the source zip code and returns a city name.
The city name used will be the USPS preferred city name for the zip
code being searched.