Print Help
Premium Pro Enterprise provides you with several print methods for the returns, schedules, and reports available in the software.
|
The Print Menu allows you to print multiple returns, schedules, and reports for one or more companies. Use this option if you would like to select additional or supporting documents to print with your selections, or if you would like to print returns for multiple companies in a single print job. You also may adjust some print options from this location as well. To access, go to File, then select Print. More Info>
You may print any item you are viewing in the active window simply by clicking on the Print icon on the toolbar. By default, this feature prints only the current page.
You can select whether or not the header/footer, stamps and pencil marks, and supporting schedules and worksheets associated with that specific page also print by adjusting the Print Options.
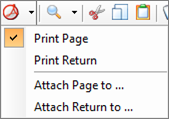
To print all pages of the current return you are viewing in the active window, click on the dropdown arrow on the Print Icon and select Print Return. Your selection will be saved, so the next time you click on the Print Icon it will print the entire return.
To print the current return you are viewing in the active window, click on the dropdown arrow on the Print Icon and select Print Return. Your selection will be saved, so the next time you click on the Print Icon, it will print the entire return. You can select whether or not the header/footer, stamps and pencil marks, supporting schedules and worksheets, and check requests also print by adjusting the Print Options.
To switch the action of the Print icon back to print the current page only, simply select Print Page from the icon dropdown. You may also change the action of the icon to print the complete return by holding the CTRL key while clicking the print icon.
You may print any item you are viewing in the active window to a PDF file by clicking the Print to PDF icon on the toolbar. Again, by default, this feature only prints the current page. However, you can choose to print the entire return by selecting Print Return from the dropdown arrow on the icon. You may also print the complete return by holding the CTRL key while selecting the PDF icon.
You may also choose Attach Page to or Attach Return to from the dropdown in order to print a page or a complete return directly to the Attachment Frame. This feature allows you to print an item, such as a credit worksheet or return, directly into the attachment frame of another return.
- Open both the item you want to attach and the item you want to attach it to.
- While viewing the item you want to print, go the Print to PDF dropdown and choose Attach to.
- Choose the item you want to attach the PDF to.
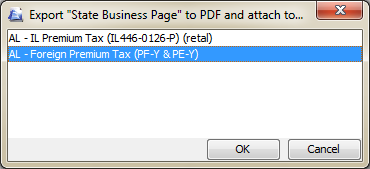
- The Attachment dialog box will appear. Choose your desired options and select OK.
- The item you printed will now be in the Attachment Frame as a PDF.
You can also print returns and jurisdictions using the right select menu. Highlight the desired return(s) or jurisdiction(s) in the Active tree, right click, and choose Print Returns or Jurisdictions. The selected returns will print to your default printer based on your Print Options.
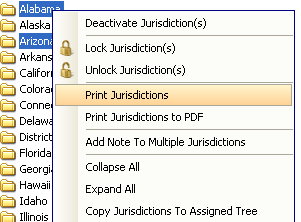
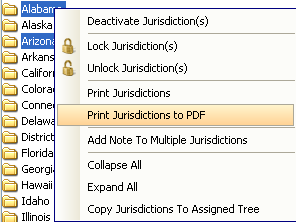
You can also print to PDF using the right select menu. Highlight the desired return(s) or jurisdiction(s) in the Active tree, right click, and choose Print Returns or Jurisdictions to PDF. To select multiple items, hold down the Ctrl key on your keyboard while clicking on each return or jurisdiction. The selected returns will print to PDF based on your Print Options.
If you need to print address labels for select returns all at one time, using right select to print them can be a big time saver. The program supports Avery 5160 labels.
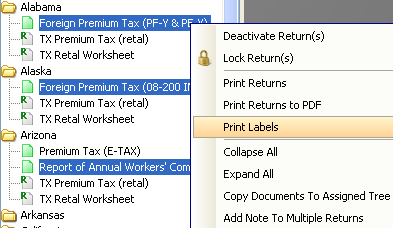
To print labels through right select, expand the appropriate jurisdictions and highlight the desired return(s) in the Active tree. To select multiple filings, hold down the Ctrl key on your keyboard while clicking on each return. Then right click on any highlighted return, and choose Print Labels.
You may then choose the row and column of the label sheet you would like to begin printing on. You may also select to print address labels for only the filings that have check requests.
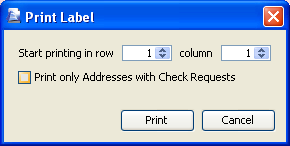
Labels for the selected returns will print to the default printer selected in your Enterprise Print Options.
You may print a full page of a single label. To do so, go to the Filing Info Schedule, right click on the address you wish to print, and choose Print Label (Whole Page).
Press Yes to confirm that the address shown is the address you wish to print.
The Printing Options allow you to change various printing capabilities. These options are available under Tools>Options>Printing Options tab. These options will determine what prints when utilizing Right Select Print, and determine if you would like to print the header/footer, stamps and pencil marks, supporting schedules, and worksheets when utilizing the Print Page icon. When Print Return is selected from the Print icon, the Check Request prints are also determined by these Print Options. These changes will be saved and recur with each print job, but the Print Option settings are unique for each module, so you must apply new Print Options in each module for them to take effect. More Info>
See the Municipal Print help topic for printing help specific to the Municipal Module.
Our website address: www.tritechsoft.com
Our mailing address: 1205 S. Greenville Ave, Allen, TX 75002.
Questions? You can reach us at 1-800-380-6407
Or contact WebSupport here.
©1995-2015 TriTech Software Development Corp. ©2006-2015 TriTech Services Inc. All rights reserved. Premium Pro® is a registered trademark.